If you want to boost your vehicle’s performance significantly, installing a turbocharger is a practical upgrade. It’s a rewarding project that not only enhances your engine’s power but also provides an exciting driving experience. Gather your tools and attention to detail; you’re about to transform your ride.
Begin by choosing the right turbocharger for your engine. Research specifications and compatibility to ensure optimal performance. Popular options often include brands like Garrett or BorgWarner, known for their reliability and efficiency. Once you have your turbocharger, prepare your workspace with all necessary tools: wrenches, a socket set, and an oil catch can are just a few items on the list.
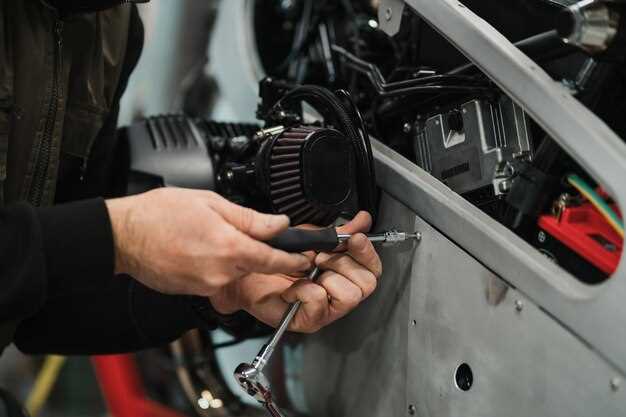
Before starting the installation, make sure your engine is cool to avoid burns. Disassemble parts blocking access to your engine bay. This usually includes removing the intake manifold, exhaust manifold, and any ancillary components. Keep track of all bolts and hoses, labeling them as you go for easy reassembly. This meticulous approach saves time and frustration later on.
With everything cleared, mount the turbocharger on the designated exhaust manifold area, ensuring secure placement following the manufacturer’s instructions. Attach oil lines next, utilizing new gaskets and seals to prevent leaks. Double-check your connections to confirm they’re tight and fit correctly.
Next, connect the intake piping to your turbocharger, ensuring a smooth airflow path. After securing your intake connections, install an appropriate intercooler setup, if applicable, to maintain optimal air temperatures. Completing these steps lays a strong foundation for performance enhancements.
Finally, fill the system with oil, double-check all connections, and reinstall any components you removed earlier. Use diagnostics tools to check for leaks and ensure the system operates smoothly. Once everything is secure, start your engine and enjoy the upgraded power boost your DIY project has provided!
Choosing the Right Turbocharger for Your Vehicle
Select a turbocharger that matches your engine’s specifications to ensure optimal performance. First, determine your engine displacement; smaller engines typically benefit from smaller turbos, while larger engines may require bigger units to achieve desired power levels.
Evaluate your power goals. If you aim for modest gains, a stock or slightly upgraded turbo may suffice. For substantial performance increases, consider larger aftermarket turbos designed for high horsepower. Check the turbo’s horsepower rating, ensuring it aligns with your target numbers.
Assess the turbo’s lag characteristics. Turbochargers with smaller wheels can spool up quickly, offering better low-end torque. Larger turbos may produce power at higher RPMs but can introduce lag. Choose one that complements your driving style.
Review compatibility with your vehicle’s existing components. Ensure the turbocharger fits with your exhaust manifold, intercooler, and fuel system. Aftermarket support is crucial; select a brand with a good reputation and available parts for future upgrades or repairs.
Don’t overlook the type of turbo: twin-scroll, single, or twin-turbo setups offer different advantages. Twin-scroll turbos reduce turbo lag and improve efficiency, while twin-turbo setups allow for a combination of low-end power and high-end performance.
Lastly, calculate the cost, considering not only the price of the turbocharger but also installation and additional components needed. A well-planned budget ensures you achieve your performance goals without overspending.
Gathering Necessary Tools and Materials for Installation
Begin by collecting a complete set of tools needed for turbocharger installation. A mechanic’s toolset with sockets, wrenches, and screwdrivers will cover most tasks. Ensure you have both metric and imperial sizes available, as your vehicle may require different measurements.
Include a torque wrench in your toolkit for accurate tightening of bolts and fasteners. This prevents future leaks and failures. A utility knife helps with cutting any hoses or materials, while pliers will assist with removing clamps and fittings.
Gather specific components like a new turbocharger, wastegate, oil and coolant lines, along with all necessary fittings and gaskets. Consult the turbocharger’s instructions to check for any unique requirements.
Don’t forget about fluids; have fresh oil and coolant ready for the installation. A catch can for old oil will make the process cleaner.
A reliable jack and stands or ramps are necessary for safely lifting your vehicle. Ensure they are rated for the weight of your car. If you’re working in a tight space, a creeper will add comfort as you work under the vehicle.
Lighting is essential. Use a bright work light to illuminate the area you’re working in, especially under the hood or vehicle.
Lastly, keep a digital device handy for reference materials, videos, or forums that can provide additional guidance throughout the installation.
Preparing Your Engine and Workspace Before Installation
Begin with a thorough inspection of your engine. Check for any leaks or damages that could affect performance. Ensure all fluids, including oil and coolant, are topped off and in good condition.
Gather your tools and materials. You will need:
- Socket wrench set
- Screwdrivers (flathead and Phillips)
- Torque wrench
- Boost gauge
- Turbocharger kit with all supplied components
- Engine gaskets and seals
- Silicone sealant
- Compressed air
Select a well-ventilated, clean workspace. Ensure ample lighting and space to move freely around the vehicle. Lay down a tarp or protective covering to catch debris and fluids.
Disconnect the battery to prevent any electrical shorts or accidental starts during installation. Label and organize all hoses and wires you remove to make reinstallation easier later.
Remove any components blocking access to the turbo installation area. This often includes the intake manifold, exhaust manifold, and sometimes the intercooler. Carefully set these aside, keeping track of hardware.
Inspect your turbocharger kit. Make sure all parts are intact and check the installation manual for specifics related to your engine model. Replacing any damaged components before starting the installation will save time later.
With everything prepared, you’re ready for a successful turbocharger installation. Enjoy the process and the boost in performance that follows!
Step-by-Step Process of Installing the Turbocharger
Begin with gathering all necessary tools: a socket set, wrench set, torque wrench, and various sizes of screwdrivers. Ensure you have a complete turbo kit compatible with your vehicle model.
Next, disconnect the battery to prevent any electrical shorts. Remove the intake manifold and exhaust components to access the engine block. Vacuum any debris from the area to keep it clean.
Install the turbocharger flange first. Attach the turbo mounting bracket securely to the engine using the appropriate bolts. Ensure that studs are installed correctly to prevent stripping.
Connect the exhaust inlet to the turbo. Use a high-temp gasket sealant to prevent leaks. Tighten with a torque wrench according to the manufacturer’s specifications.
Install the wastegate actuator next. Follow the diagram in your kit to ensure proper alignment. Check bolt tightness before proceeding.
Attach the compressor outlet to the intercooler piping. Use silicon hoses with clamps to provide a secure connection. Take care to avoid kinks in the hoses.
Connect the oil supply line next. Make sure to use new crush washers for a proper seal. Route the oil drain back into the pan, ensuring no sharp bends that would cause oil to back up.
Reinstall any components removed earlier, including the intake manifold. Review all connections, ensuring everything is properly secured and no tools remain in the engine bay.
Finally, reconnect the battery and start the engine. Monitor oil pressure and check for any leaks. Test drive your vehicle to ensure everything functions smoothly.
Connecting Intercooler and Exhaust Components After Installation
Begin with aligning the intercooler pipes with the turbocharger and the intake manifold. Ensure that all connections are tight to prevent any air leaks. Use quality clamps that can withstand high pressure and temperature. Securely fasten each connection with a wrench to avoid any disconnections during operation.
When attaching the intercooler, place it in the designated area within the engine bay, ensuring proper clearance from surrounding components. Connect the outlet of the turbocharger to the intercooler inlet using the silicone couplers provided in your kit. The angles of the pipes should be smooth to allow for unrestricted airflow.
Next, connect the intercooler outlet to the intake manifold. This connection should also be secure and leak-free. Route the pipes for optimal airflow and avoid sharp bends that could restrict performance. Use a heat shield if necessary to protect any components from excessive heat.
For the exhaust components, start with the turbocharger’s outlet. Connect this to the downpipe using the fitting designed specifically for your setup. Ensure there’s a gasket in place to facilitate a tight seal. Tighten all bolts uniformly to avoid any exhaust leaks.
Verify the alignment of the exhaust system from the downpipe to the muffler. Adjust any hangers to ensure the system is securely mounted without excessive movement. Inspect every joint to ensure they are angle-friendly, allowing for expansion when heated.
After all connections are made, double-check for any loose fittings or clamps. Perform a visual inspection for clearance between components and any potential contact points. This thorough approach prevents future issues arising from vibration or heat expansion.
| Component | Notes |
|---|---|
| Intercooler | Ensure tight connections with clamps and proper alignment. |
| Intake Manifold | Secure intercooler outlet to prevent leaks. |
| Turbocharger Outlet | Use a suitable gasket for a tight seal on the downpipe. |
| Downpipe | Ensure alignment with exhaust system for optimal flow. |
Finally, check for leaks using a smoke test on your intercooler system and inspect for any exhaust gas leaks. This confirms that your connections are secure and ready for operation. Once satisfied, you can start the engine and monitor performance, making adjustments as necessary.
Tuning Your Engine for Optimal Performance Post-Installation
Adjust your fuel mapping to match the increased air intake from the turbocharger. Use a reliable tuning software to modify the fuel-to-air ratio, ensuring it complements the turbo setup. Aim for a slightly richer mixture under boost to prevent knock and maximize power.
Modify ignition timing for enhanced performance. Retard timing slightly in boost zones to avoid pre-ignition and adjust as necessary based on dyno tuning results. This change helps maintain engine safety while optimizing power output.
Invest in a quality exhaust system. A free-flowing exhaust reduces back pressure, allowing the turbo to spool more efficiently and enhances the overall performance. Look for high-flow catalytic converters and aftermarket mufflers that complement your setup.
Upgrade your intercooler. A larger, more efficient intercooler mitigates heat generated by the turbocharging process. Cooler air entering the engine improves power and reliability, especially under prolonged boost conditions.
Monitor your engine parameters closely. Use an OBD-II scanner or dedicated performance gauges to track boost levels, air-fuel ratios, and engine temperatures. Regular checks help in making minor adjustments for peak efficiency.
Consider software tuning as a final step. Custom ECU tuning by professionals can refine all parameters for your specific turbo setup, ensuring maximum performance and reliability. Each engine responds differently to modifications; customized solutions yield the best results.